The El Plomo mountain (Cerro El Plomo) is a perfect “first” high altitude mountain. It is also fantastic for altitude training and acclimatizing if you’re preparing for higher mountains in the Andes mountains. The El Plomo mountain is typically done in 3 days, but can be done in two depending on experience.
–
El Plomo Mountain – Normal Route
El Plomo Mountain Day One: 4-6 hours
Valle Nevado Ski Resort to Federación Base Camp
The trek to the El Plomo Mountain (Cerro el Plomo) Base Camp sits at an elevation of 4100m/13450ft, and you wind through a geographically rich valley to get there. It’s not hard but does have its share of steep hills that curve up, down, and around different mountain slopes, so physical ability is very important.
Starting in mid December depending on conditions, the Valle Nevado Ski Resort allows 4×4 cars to pass through to its highest ski lift, Three Points (Tres Puntas). This is a total blessing because it saves a solid few hours of walking through the brown, rolling hills of the ski slopes. They may look jaw-droppingly impressive when covered in snow, but not so much in bare, naked dirt.
You park at Three Points (Tres Puntas) which has an elevation of 3600m/11800ft. From Three Points (Tres Puntas) you have 1ish hours to Piedra Numerada, and then 3-5 hours until Federación Base Camp. If you don’t have a 4×4 you can start from the La Parva Ski Resort and take the ski lift to it’s highest point, then cross over and down to Piedra Numerada.


Checkpoint: Piedra Numerada, 3300 m / 10826 ft
The route starts with three long, significant downward slopes, finally ending at the lower part of the valley in a rest/camp spot called Piedra Numerada. With the river that runs by, this is an ideal spot to fill up the camelback, take a quick rest and eat some fruit. From here, you follow the river and start climbing up, always with a great view of the El Plomo Mountain.
Just under half way, you’ll pass a little waterfall on your left and some frozen waterfalls a little further on your right. I always feel that from the car to the waterfall, time flies…. but from the waterfall to Federación Base Camp, the minutes and steps prefer slow mo!
The next couple hours are over a rocky footpath, but easy to follow. The valley is gorgeous and the route to Federación is for nature enthusiasts of all levels. That said, a hiking trip just to Federación could be a fun weekend camping trip from Santiago, for those who like adventure but don’t climb mountains.
Note: There is water at Federación, the El Plomo Mountain Base Camp, and it flows ice cold from the glaciers above.
A GUIDE BY YOUR SIDE (AND IN YOUR INBOX)
My “Word Cairns” newsletter sends inspiration, tips, stories, and photos from wild corners of this world. Plus, you’ll be the first to know about new expeditions, activities, and special offers.

Day Two to El Plomo Mountain: 7 – 13 hours
Federación Base Camp to Summit
Summertime on the El Plomo Mountain can sometimes look more like hotel El Plomo. No joke! On one long holiday weekend we counted 75 tents!! This is because it is a common “first” high altitude mountain for those in the Santiago Metropolitan Region area. And, all the mountaineers training for taller mountains, like San Jose Volcano, Marmolejo Volcano, Mount Aconcagua, etc, use the El Plomo mountain (Cerro El Plomo) for acclimatizing.
That said, if you put on the social hat, you’re bound to meet some cool, mountain lovers! People who get there early tend to sit outside their tents and talk until the night chill sets in. Non-holiday weekends are much less crowded.
The route through the valley starts on the left. Look hard to see the little tents right below the mound in the middle! Leoneras is the tall mountain on the right.
The Federación Base Camp is a large flat bowl, surrounded by the El Plomo Mountain to the right and Leonera Mountain / Cancha de Carreras to the left. It almost always closes the day with a gorgeous sunset.
Summit day should start around 3-4 am, since the climb to the top ranges from 7-10 hours. This of course depends on your physical capabilities, reaction to the altitude, the weather conditions, etc. Your summit / attack backpack needs to have your ice ax, crampons, route snacks, nalgene with water, etc. Hand and food warmers, as well as a bottle sleeve for your nalgene is recommended because it’s normal to be 10 below 0 even in the summertime.
The first section, from Camp to La Olla, is a steep acarreo (highly sedimentary incline). Some people like to camp at La Olla instead of Federación, but I’ve never seen the benefit of carrying full weight for that stretch. It tires your legs and doesn’t save much time, as in the morning it only takes 1/2 hour with your attack backpack.
Breathtaking view of El Plomo and the Iver Glacier, from La Olla
The benefit, hands down, is the view. You’re next to a little lagoon and you’re literally at the foot of the El Plomo mountain and the Iver glacier. Picturesque to say the least.


Checkpoint: Agostini Shelter 4600 m / 15,100 ft
Passing La Olla you continue up until you get to the Agostini shelter, which can fit 10ish climbers. However, on a cold morning, I’ve seen plenty more climbes huddled together haha. It’s the perfect spot to catch a little break, get out of the wind, snack and recover energy. Usually, the sun is just starting to shoot her rays over the valley and mountains below, which adds another level of energy to the soul.
On a cold morning, you’d be surprised how many mountaineers can pile in here haha!
Checkpoint: Pirca del Inca, 5155 m / 16,900 ft
From Agostini, you follow the route up a very, very long and steep acarreo until you get to the Pirca del Inca . Pay attention to the route, which slightly curves to the right at some point, otherwise you’ll end up stuck on a much more direct, but leg kiiiilling incline. When it comes to the mountain and you’re heading up, direct routes can be deceivingly enticing… but don’t fall for it! Haha.
The route up after Agostini, pure “acarreo” – a highly sedementary terrain on a steep incline
The Pirca del Inca is a small stack of rocks where they found an almost perfectly preserved Incan boy in 1954. The Incans sought out the highest peaks for their ceremonies, in order to be as close to the heavens as possible. The El Plomo Mountain is the highest peak in the Santiago Metropolitan Region.
I typically take a small break at the Pirca to eat a fruit pouch and some nuts. Here is also where you need to put on your crampons and get your ice ax out to safely cross the Iver glacier. Here the glacier is at it’s narrowest point, so it’s a short crossing but having the right gear is essential. Prevention is key! Slipping on the hard snow / solid ice is definitely not the idea. It’s a long way down.
Once you cross the glacier, you’ve got about an hour a half left until the El Plomo Mountain Summit. So close, but oh so far! At this point, the altitude is taking its toll, your steps are slower and your heart is pounding harder. Slowly but surely, you do the last 2 steep inclines (accareos), looking up every 10 steps to see how much is left. I get it, but don’t lose faith! You’re almost there.
Checkpoint: El Plomo Summit 5,424 m / 17,800 ft
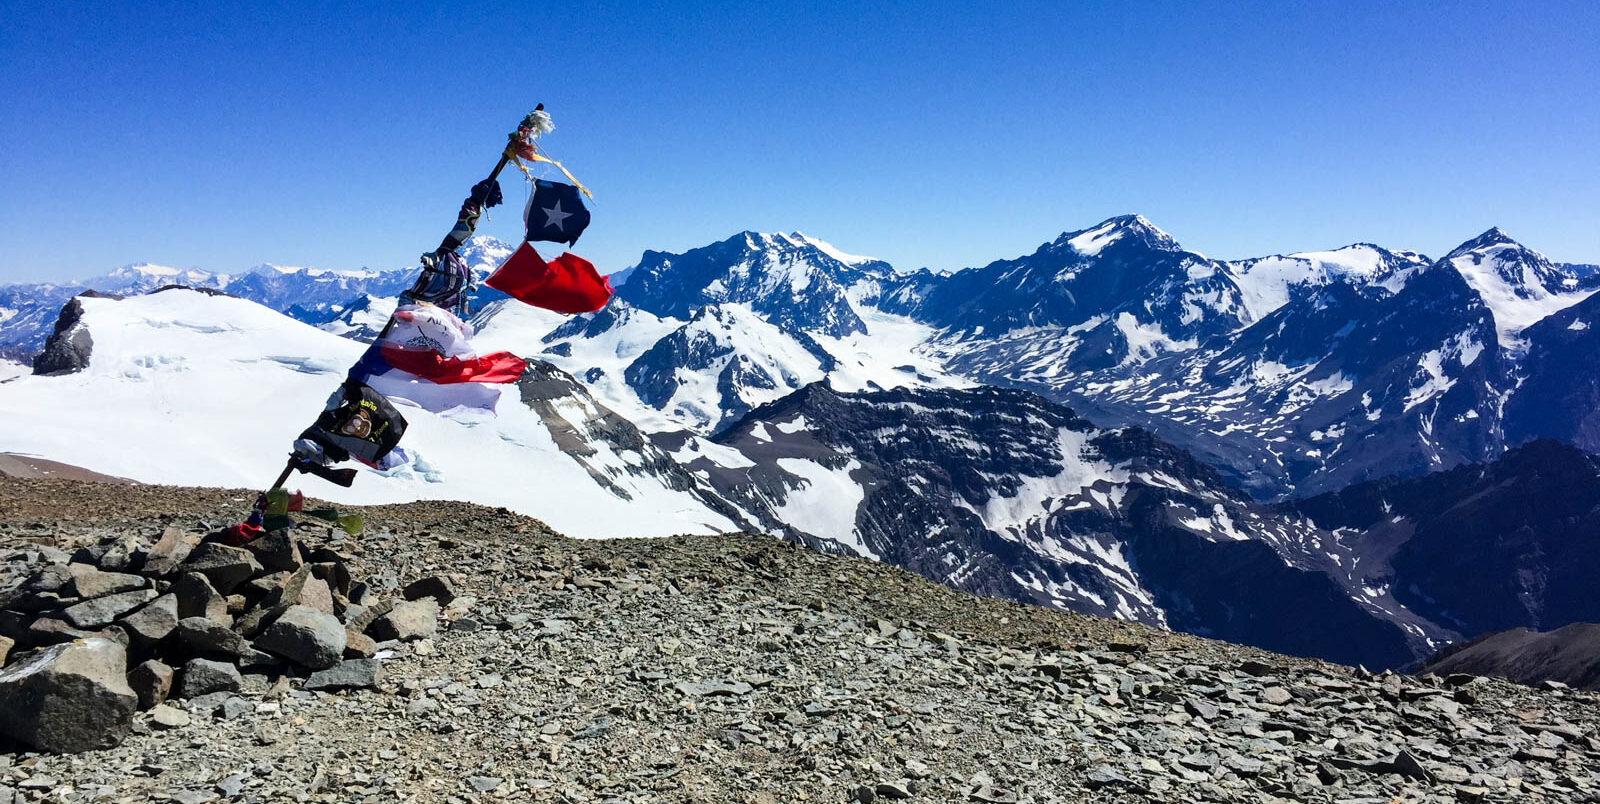
You get to the last tip, thinking it’s gonna be the summit, but damn, there’s just a little bit more. The summit is just behind, so it’s just 10ish minutes until you will finally see the flag flapping in the wind. What a relief!!
After the necessary summit pic in every direction, I like to sit and eat my snickers. It’s my not so guilty summit reward. The El Plomo mountain summit tends to be windy and it clouds over in the early afternoons, which is why it’s a best practice to arrive before 1pm.
On the way down, if you’re good with crampons and comfortable with your ice ax / self-stopping abilities, you can head directly down the Iver glacier, straight to the Pirca del Inca. If you’re not sure of your abilities or the ice / snow is bad, just go down how you came.
The benefit of the quad splitting steep inclines on the way up, is that the downward trek goes quite fast. You can get back to Federación base camp in 2-3 hours if you’re confident with your feet and have good boots.
A good technique if you have hard-bottomed boots is long, downward strides. You lean your body slightly backwards with all the pressure focusing into your heels. The key here is finding the softer parts with millions of smaller rocks and pebbles, so that your heels can really sink in.
It can take a while to get the hang of this technique but once you overcome the fear and learn to trust your legs, feet and boots, you basically will fly down the mountain when on this type of terrain.


Day Three to El Plomo Mountain: 4-5 hours
Federacion back to the car / Santiago
Back in Federacion Base Camp, happy with your El Plomo summit, it’s a relaxing evening and much needed night’s rest. Contrary to on the way in, you hit the waterfalls super quickly and in no time arrive to Piedra Numerada.
But here, this is where the slo mo kick in on the way back. From Piedra Numerada you have the last 3 looooong climbs to get up and out of the valley.
They are quite exhausting for your already tired legs, and even more so with the blaring summer sun. But remember, there’s water in Piedra Numerada so take a break and enjoy the day before making the last stretch.
Refresh, take it easy, slow and steady, and enjoy the view!
Related Articles

I'M TALKIN' TO YOU
Purpose-driven people who feel compelled to make life meaningful for yourself and others.
Outdoor-inspired people whose best self comes alive when experiencing beautiful places and pushing your limits in the open air.


